Sunday, August 27, 2006

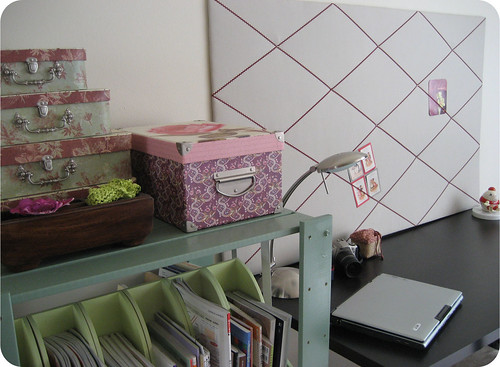
Izakaya style restaurant

Yesterday, Hubby and I had dinner at Musha, our local Japanese restaurant. It is a tapas restaurant. The food is delicious, the ambiance informal and the staff friendly. What more can you ask?!

We had our favorite fried prawns with a spicy sauce, the tuna cakes and this time we tried one of their specialties: the musha risotto. It was rich and creamy... just look at this:


For dessert, I had a very tasty chocolate soufflé with vanilla ice cream. Hubby had a delicious green tea ice cream. One of my favorite place to dine!


いただきます! Bon appétit!

My little corner

I had mentioned some diy projects here 2 weeks ago. It's taken me a few days to complete these as I injured my back in the process of re-organizing the room.

Project "Revamping boring shelves" was very easy to complete. Some sanding, 2 coats of sage paint and 4 coats of clear varnish. As you can see on the picture below, it makes a difference!

J'ai enfin terminé les 2 projets de déco que j'avais prévus de faire il y a 15 jours.
Le premier projet: peindre une étagère Ikea que je trouvais trop tristounette. 2 couches de peinture et 4 couches de vernis. Projet facile et rapide à réaliser!
Le 2ème projet était un peu plus fastidieux! Réalisation d'un pêle-mêle.


Project "Large Fabric Mood Board" was a little more tedious to complete! It will be the perfect place to put pictures, fabric samples, small items that get lost easily. It is made of a heavy duty cotton and a pretty ric rac.


TUTORIAL :

Materials
  • Masonite board (cut to size) 60"x36" (153x92cm) 1/4 inch thick (7mm)
  • Heavy duty cotton 40"x64" (102x163cm)
  • Quilt batting: 2 layers of 40"x64"
  • Ric rac (or ribbon) 12 yards (11m)
  • 13 cut tacks (at most diy stores)
  • A hot glue gun, a hammer and a small staple gun

    Directions
  • Cut the batting and fabric to size. I allowed 2" of overhang on each side). Press the fabric.

  • Place the board on a flat surface and with a glue gun, glue the 2 layers of batting onto the board. Miter the corners to avoid "bulk". Turn the board and glue the overhang batting.

  • Place your fabric on a flat surface and put the board (batting side down)on top of it. With a staple gun, first staple in the middle of each side, ensuring the fabric is stretched well. Then gradually staple towards the corners and finally the corners. You can trim some of the excess fabric at the corners if you wish.

  • Turn the board to the right side (front). Now it's time to decide which criss cross pattern you want on your board. I used a piece of string to play with different patterns. I chose a 10 lines design which required approx 12 yards (11m) of ric rac. A design with 14 lines would have required approx 16 yards (15m)

  • Start with the longer lines and place the first tack where the 2 lines cross (center of the board). As you add more lines and tacks, make sure the ric rac/ribbon is really well stretched. Once you've put all the tacks on the front, turn the board and with the staple gun, staple the extremities of the ric rac/ribbon.

  • There are different ways of fixing the board to the wall, depending on how heavy your board is and what type of wall you have. I have chosen an easy route... Carefully drill 2 holes at the back of the board (be careful not to drill onto the fabric). Drill to holes on the walls and put 2 long nails and just hung the board like this! Thanks to hubby for his help with the drilling :)


    Fournitures
  • Panneau de particules de 153x92cm et 7mm d'épaisseur
  • Tissu en cotton 102x163cm
  • 2 rectangles de molleton de 102x163cm
  • Croquet (ou ruban) 11m
  • 13 broquettes (clous très courts)
  • Pistolet à colle, marteau et agrafeuse electrique.

    Réalisation
  • Découper un rectangle de 102x92cm dans le tissu et 2 rectangles de 102x92 cm dans le molleton.Bien repasser le tissu.

  • Poser le panneau de particules sur une surface plane. A l'aide du pistolet à colle, coller les 2 rectangles de molleton au panneau. Tourner le panneau à l'envers et coller les rabats.

  • Mettre le tissu à plat et poser le panneau dessus (côté molletoné sur le tissu). Agrafer le tissu sur l'envers du panneau en prenant soin de bien le tendre. Couper le tissu au niveau des coins si nécessaire.

  • Tourner le panneau sur l'endroit. Pour choisir le motif du croquet/ruban, prendre de la ficelle et faire des essais. Il faut compter 11m de croquet/ruban pour réaliser les 10 lignes de mon panneau. Pour 14 lignes, il faut compter 15m de croquet.

  • Commencer par 2 lignes diagonales. Clouer une broquette à l'intersection des 2 diagonales. Ajouter une longueur de croquet et clouer à l'intersection de 2 longueurs. Continuer le processus pour les autres lignes. Lorsque toutes les lignes de croquet/ruban sont fixées, tourner le panneau et fixer les extrémités au dos du panneau avec une agrafeuse electrique.

  • Il y a différentes façons d'accrocher le panneau au mur selon le poids du panneau, le mur etc.. j'ai choisi la solution la plus rapide. J'ai percé 2 trous au dos du panneau en faisant attention de ne pas transpercer le molleton et le tissu. 2 clous (grosse taille) dans le mur et le tour est joué! Je rajouterais qu'une paire de mains supplémentaire facilite certaines étapes du projet! Notamment lorsqu'il faut clouer le croquet et le tendre en même temps.
  • Thursday, August 17, 2006

    More swap!

    A while ago, I mentioned that I had discovered this great website, Gimme Your Stuff and that I had a swap with Anjali underway.

    Gimme Your Stuff


    Well, the swap is complete!

    I could hardly contain myself when I saw the pink package!! The lovely Anjali picked the cutest fabrics for me! She also sent me my favorite Japanese magazine: Cotton Friend. Lots of great cotton projects! And a wonderful sewing book: Cotton Chic. I love those simple designs.. très chic indeed!

    What can I say? Thank you so much Anjali! You made my day!


    ISBN 4-579-10961-9 Machiko Kayaki


    This is what I sent to Anjali:

    Monday, August 14, 2006

    Change of plans!

    Despite my good intentions of doing some decorating at the weekend, I changed plans as the weather was just too beautiful to stay indoors!

    Had a lovely time at Point Dume beach near Malibu. It was surprisingly quiet for a Saturday morning.


    Sunday morning was spent at the amazing Rose Bowl flea market in Pasadena. Huge flea market! Great for antics, 70s furniture, toys, vintage trims, jewelry, lots of bric à brac...I would probably have spent all my day if it hadnt been so hot. Mental note to self: next time bring hat and sun lotion!


    To cool down, hubby and I went to Pasadena Old Town where we found a lovely French cafe/bakery.

    Changement de programme ce week-end!
    Malgré mes bonnes intentions de faire de la déco ce week-end, il faisait trop chaud pour s'enfermer! Nous sommes allés à la plage samedi matin. Très belle plage à côté de Malibu.

    Hier, direction Pasadena où il y avait une brocante. Une des plus grandes brocantes des Etats Unis à mon avis.On y trouve de tout: des meubles, des frippes, du linge ancien, des bijoux anciens.. bref le paradis! Je n'y suis pas restée aussi longtemps que prévu car méga coup de soleil sur les épaules! prochaine fois: chapeau + crème solaire!

    Friday, August 11, 2006

    Decorating project for the weekend.

    Too much procrastination... I bought some plain wooden shelves 2 months ago.. Didnt really want to paint them at the time although it's been bugging for a while. They are so plain and boring, I should really add some color to them! I got a can of Sage paint last weekend so hopefully they will turn out ok. I'm also gonna make a larger padded mood board to hang over my desk.

    Un petit projet déco pour le week end. J'ai décidé de peindre les étagères en bois que j'ai achetées il y a 2 mois. Voilà qui m'occupera une partie du week end! Je vais aussi faire un "mood board" (désolée, je ne me rappelle plus du nom en français!) pour mettre au dessus de mon bureau.

    Tuesday, August 08, 2006

    Rodeo Drive

    After a dreaded doctor's appointment, my friend Michelle and I went to Beverly Hills for some window shopping yesterday.
    These are some pictures of unusual windows on Rodeo Drive. If you wonder, what's with the honeycomb window... a fabulous Harry Winston diamond ring in the middle! Honey...?!


    Thursday, August 03, 2006

    Vintage Button Swap

    Whohoo, that swap thing is getting addictive!

    I signed up for the Vintage Button Swap organized by the amazing Sally from Shim and Sons 2 weeks ago. I was rather excited as it was my first swap in the US!


    Moki was my swap partner. She sent me those cute buttons. Thanks very much Moki.


    This is what I sent to Moki


    Tite traduc pour les keupines françaises!

    Il y a 15 jours , je me suis inscrite au swap "boutons anciens" organisé par Sally de Shim and Sons. J'ai fait mon échange avec Moki.
    Les boutons sur la première photo sont les boutons qu'elle m'a envoyés.
    Sur la deuxième photo, ce sont les boutons que je lui ai envoyés.

    Wednesday, August 02, 2006

    A little help.../ Un petit coup de pouce...

    A week ago, I wrote a post about Liberty prints and Liberty Addict, A French blog entirely dedicated to those beautiful prints. Following that, Silo, who jointly manages the Liberty Addicts blog, contacted me. Today, she wrote a paragraph called "les nouvelles de l'été" (the new bloggers of the summer), and mentioned my blog. Rightly she says it's not easy to start a new blog and have traffic. Couldn't agree more, it is hard! There are so many other blogs there, so many talented people! So I wanted to thank Silo for mentioning my blog!


    Il y une semaine, j'ai écrit un billet sur les tissus Liberty et Liberty Addict, un blog français consacré aux très belles étoffes Liberty. Silo m'a contactée par la suite. Elle co-gère le blog Liberty Addicts. Dans son billet du jour, Silo a écrit un paragraphe intitulé "les nouvelles de l'été" consacré aux nouvelles bloggeuses et a fait mention de mon blog. A juste titre, elle dit qu'il est difficile de faire ses débuts dans la bloggosphère. Je suis entièrement d'accord avec sa remarque, c'est pas évident de se faire une petite place parmi tous ces blogs et toutes ces filles pleines de talent! Je tenais à remercier Silo de son petit coup de pouce!

    Tuesday, August 01, 2006

    Des fleurs..

    Peonies are one of my favourite flowers. I love their delicate texture. The petals look like feathers.